最新国外VPS云服务器一键重装系统合集,一键DD安装Linux和Windows
我们在购买VPS云服务器安装自己的操作系统有两大好处:一是可以安装自己想的操作系统,例如一些最新的CentOS 8、Ubuntu 20、Debian 10等Linux操作,有些主机商可能没有提供安装;另一个好处就是可以安装“干净”的操作系统,用主机商的操作系统总会有一些“无关”的进程。
例如不少人用的阿里云、腾讯云等云服务器都会自带一些监控以及安全进程,很多人觉得这些进程非常地“鸡肋”,配置差的VPS主机不如将这些进程去掉,“干干净净”的VPS才用得放心。最后,尤其是国外商家,碍于主机商的Windows授权费太贵,很多人想要安装自己的Windows系统。
基于以上需求,一键DD安装Linux和Windows系统脚本就应运而生了,VPS主机一键重装系统工具可以快速安装Linux系统,例如CentOS,Debian,Ubuntu等等,Windows系统2019、2016、2012R2、2008R2、7、2003等等,以及自定义其他系统。
当然你也可以自己制作DD镜像,然后用这些脚本来安装自己的操作系统。经过测试,本文分享的一键重装系统工具可以用在阿里云、腾讯云等轻量服务器上,而且安装速度非常地快。
一、一键重装AutoReinstall.sh
网站:
项目:https://github.com/hiCasper/Shell
备用:https://github.com/freehao123/Shell/tree/master
本一键脚本在萌咖大佬的脚本基础上开发,实现了懒人式一键网络重装 Debian / Ubuntu / CentOS 系统及dd方式安装系统,支持重装的系统Ubuntu 18.04/16.04 、Debian 9/10 、CentOS 6 、CentOS 7 (DD方式)和自定义DD镜像。
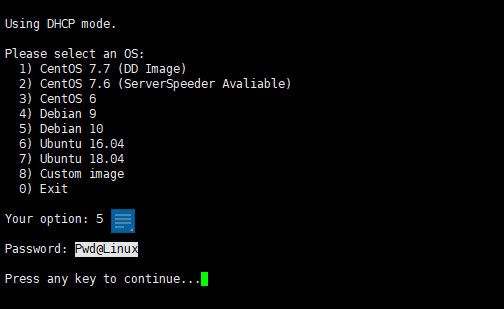
- Using DHCP mode.
- Please select an OS:
- 1) CentOS 7.7 (DD Image)
- 2) CentOS 7.6 (ServerSpeeder Avaliable)
- 3) CentOS 6
- 4) Debian 9
- 5) Debian 10
- 6) Ubuntu 16.04
- 7) Ubuntu 18.04
- 8) Custom image
- 0) Exit
- Your option:
执行命令安装:
- wget --no-check-certificate -O AutoReinstall.sh https://git.io/AutoReinstall.sh && bash AutoReinstall.sh
然后你就可以看到让你选择要安装的操作系统了。

重装后系统密码均在脚本中有提供,安装后请尽快修改密码,默认的是Pwd@Linux,如下图:
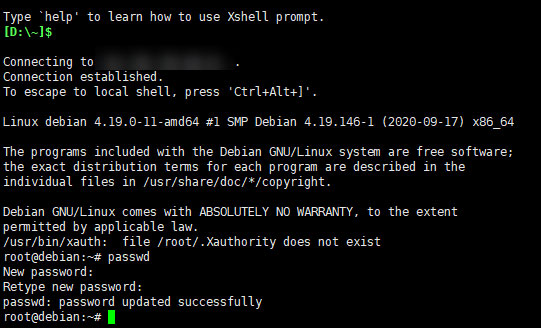
Linux修改密码的方法:执行命令:passwd,两次输入密码回车即可。
本脚本还提供一个灵活的自动重装系统脚本,你可以在安装系统前对IP等进行相应的配置:
- wget --no-check-certificate -qO AutoDD.sh 'http://git.io/autodd.sh' && bash AutoDD.sh
执行命令后,你可以开始安装你的操作系统了。
二、CXTHHHHH重装脚本
网站:
项目:https://github.com/MeowLove/Network-Reinstall-System-Modify
备用:https://github.com/freehao123/Network-Reinstall-System-Modify
CXTHHHHH一键重装脚本功能要丰富一些,而且支持安装的操作系统也多一些,我在腾讯云轻量服务器上测试也通过了。该脚本还有一个强大的功能:裸机系统部署平台,使得您可以通过IPIM/KVM/VNC/IDRAC等进行手动安装定制,例如定制分区(RAID),选择磁盘加密,配合您购买的特定商业ISO安装等高级安装选项。命令:
- #下载脚本
- wget --no-check-certificate -qO ~/Network-Reinstall-System-Modify.sh 'https://www.cxthhhhh.com/CXT-Library/Network-Reinstall-System-Modify/Network-Reinstall-System-Modify.sh' && chmod a+x ~/Network-Reinstall-System-Modify.sh
- #进入安装选项
- bash ~/Network-Reinstall-System-Modify.sh -UI_Options
- #合并下载脚本+进入安装选项
- wget --no-check-certificate -qO ~/Network-Reinstall-System-Modify.sh 'https://www.cxthhhhh.com/CXT-Library/Network-Reinstall-System-Modify/Network-Reinstall-System-Modify.sh' && chmod a+x ~/Network-Reinstall-System-Modify.sh && bash ~/Network-Reinstall-System-Modify.sh -UI_Options
- #(高级用户使用)安装 裸机系统部署平台
- bash ~/Network-Reinstall-System-Modify.sh -CXT_Bare-metal_System_Deployment_Platform
先下载脚本并进入安装选项,这时就会有图形选项让你选择安装哪一个操作系统了,该脚本包括了Linux各个版本以及Windows系统。如下:
- ================================================================
- = =
- = 一键网络重装系统 - 魔改版(图形化安装) =
- = Network-Reinstall-System-Modify (Graphical Install) =
- = =
- = https://www.cxthhhhh.com =
- = =
- ================================================================
- 0) Latest 【Bare-metal System Deployment Platform】(Recommend)
- 1) Latest 【CentOS 8】(Recommend)
- 2) Latest 【CentOS 7】
- 3) Latest 【Debian 10】(Recommend)
- 4) Latest 【Debian 9】
- 5) Latest 【Ubuntu 20.04】(Recommend)
- 6) Latest 【Ubuntu 18.04】
- 7) Latest 【Ubuntu 16.04】
- 8) Microsoft 【Windows Server 2019】(Recommend)
- 9) Microsoft 【Windows Server 2016】
- 10) Microsoft 【Windows Server 2012】
- ======以下系统已经过时,失去官方技术支持,不推荐使用。======
- ====== The system is outdated and is not recommended. ======
- 31) Latest 【CentOS 6】
- 32) Latest 【Debian 8】
- 33) Latest 【Debian 7】
- 34) Latest 【Ubuntu 14.04】
- 35) Microsoft 【Windows 10 Lite】
- 36) Microsoft 【Windows Server 2008R2】
- 37) Microsoft 【Windows 7 Vienna】
- 38) Microsoft 【Windows_Server_2003】
- Custom DD System:bash Network-Reinstall-System-Modify.sh -DD "%URL%"
- ================================================================
- Enter the System Identification Nnumber (for example: 0)
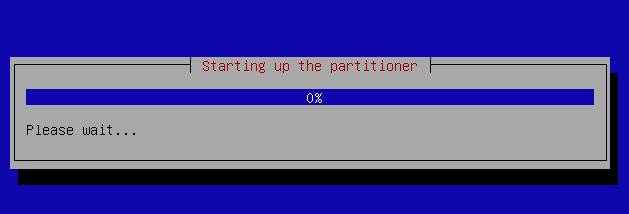
VPS主机在重装系统过程中可能速度比较慢,取决你的VPS主机的带宽速度和硬盘的读写速度,一般地你可以通过主机商的VNC平台查看VPS重装的进度。
对于Microsoft Windows。默认的用户名是:Administrator,默认的密码是:cxthhhhh.com。对于Linux(CentOS / Debian / Ubuntu),裸机系统部署平台等,默认的用户名是:root,默认的密码是:cxthhhhh.com。
系统重装完成后,请您务必立刻修改系统的默认密码。
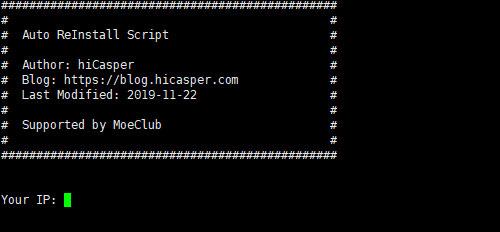
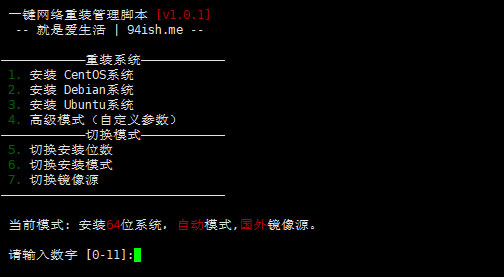
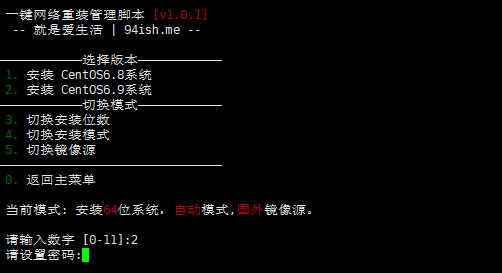
三、94ish一键网络重装系统
网站:
项目:https://github.com/chiakge/installNET
备用:https://github.com/freehao123/installNET
这是一个精简版的linux一键网络重装系统脚本,命令:
- wget -N --no-check-certificate "https://raw.githubusercontent.com/chiakge/installNET/master/Install.sh" && chmod +x Install.sh && ./Install.sh
然后你就可以选择你想要安装的操作系统了,如下图:
选择高级模式后,输入参数-dd "dd镜像地址",即可重装为Windows系统。
- 以下是Vicer提供的Windows DD包
- # win7emb_x86.tar.gz:
- https://image.moeclub.org/GoogleDrive/1srhylymTjYS-Ky8uLw4R6LCWfAo1F3s7
- https://moeclub.org/onedrive/IMAGE/Windows/win7emb_x86.tar.gz
- # win8.1emb_x64.tar.gz:
- https://image.moeclub.org/GoogleDrive/1cqVl2wSGx92UTdhOxU9pW3wJgmvZMT_J
- https://moeclub.org/onedrive/IMAGE/Windows/win8.1emb_x64.tar.gz
- # win10ltsc_x64.tar.gz:
- https://image.moeclub.org/GoogleDrive/1OVA3t-ZI2arkM4E4gKvofcBN9aoVdneh
- https://moeclub.org/onedrive/IMAGE/Windows/win10ltsc_x64.tar.gz
特别注意:萌咖提供Windows的dd安装镜像,远程登陆账号为: Administrator,远程登陆密码为: Vicer。其它的Linux操作系统在重装过程中会让你设置,如下图:
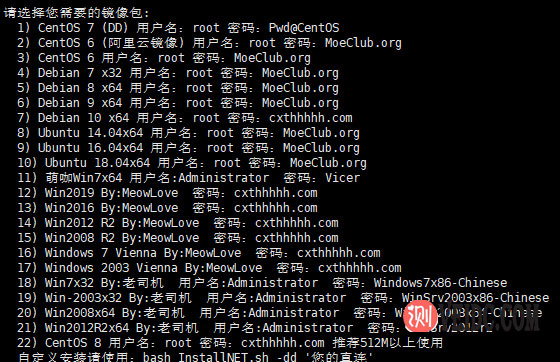
四、一键网络重装脚本集合
网站:
项目:https://github.com/veip007/dd
备用:https://github.com/freehao123/dd
这是一个一键网络重装脚本集合,以上面的脚本失效或者找不到时,这个脚本可以作为一个补充,集合了Linux和WIN包,Linux:centos6-7; Ubuntu 14 16 18;Debian 7 8 9 10;WIN:集合了”萌咖大佬、老司机、MeowLove ”的系统,包含win7 2003 2006 2012 2008 2016 2019等系统,当然也可以自定义。
- 请选择您需要的镜像包:
- 1) CentOS 7 (DD) 用户名:root 密码:Pwd@CentOS
- 2) CentOS 6 (阿里云镜像) 用户名:root 密码:MoeClub.org
- 3) CentOS 6 用户名:root 密码:MoeClub.org
- 4) Debian 7 x32 用户名:root 密码:MoeClub.org
- 5) Debian 8 x64 用户名:root 密码:MoeClub.org
- 6) Debian 9 x64 用户名:root 密码:MoeClub.org
- 7) Debian 10 x64 用户名:root 密码:cxthhhhh.com
- 8) Ubuntu 14.04x64 用户名:root 密码:MoeClub.org
- 9) Ubuntu 16.04x64 用户名:root 密码:MoeClub.org
- 10) Ubuntu 18.04x64 用户名:root 密码:MoeClub.org
- 11) 萌咖Win7x64 用户名:Administrator 密码:Vicer
- 12) Win2019 By:MeowLove 密码:cxthhhhh.com
- 13) Win2016 By:MeowLove 密码:cxthhhhh.com
- 14) Win2012 R2 By:MeowLove 密码:cxthhhhh.com
- 15) Win2008 R2 By:MeowLove 密码:cxthhhhh.com
- 16) Windows 7 Vienna By:MeowLove 密码:cxthhhhh.com
- 17) Windows 2003 Vienna By:MeowLove 密码:cxthhhhh.com
- 18) Win7x32 By:老司机 用户名:Administrator 密码:Windows7x86-Chinese
- 19) Win-2003x32 By:老司机 用户名:Administrator 密码:WinSrv2003x86-Chinese
- 20) Win2008x64 By:老司机 用户名:Administrator 密码:WinSrv2008x64-Chinese
- 21) Win2012R2x64 By:老司机 用户名:Administrator 密码:WinSrv2012r2
- 22) CentOS 8 用户名:root 密码:cxthhhhh.com 推荐512M以上使用
- 自定义安装请使用:bash InstallNET.sh -dd '您的直连'
- 请输入编号:
命令:
- ##镜像文件在OneDrive
- wget -N --no-check-certificate https://raw.githubusercontent.com/veip007/dd/master/dd-od.sh && chmod +x dd-od.sh && ./dd-od.sh
- ##镜像文件在GoogleDrive
- wget -N --no-check-certificate https://raw.githubusercontent.com/veip007/dd/master/dd-gd.sh && chmod +x dd-gd.sh && ./dd-gd.sh
然后你就可以选择你的操作系统了。
五、MoeClub一键重装脚本
网站:
项目:https://github.com/freehao123/dd
MoeClub一键重装脚本是上面四个脚本的核心,上面的优化版和修改版都是基于MoeClub一键重装脚本而来的,不过作者的博客已经不能访问了,但是脚本还可以正常使用,挖站否在好几年前就已经分享过该脚本了,目前还可以正常使用。

全自动安装默认root密码:MoeClub.org,安装完成后请立即更改密码。能够全自动重装Debian/Ubuntu/CentOS等系统,同时提供dd安装镜像功能,例如: 全自动无救援dd安装windows系统,全自动安装CentOS时默认提供VNC功能,可使用VNC Viewer查看进度。下载:
- #先运行:
- #Debian/Ubuntu:
- apt-get update
- #RedHat/CentOS:
- yum update
- #确保安装了所需软件:
- #Debian/Ubuntu:
- apt-get install -y xz-utils openssl gawk file
- #RedHat/CentOS:
- yum install -y xz openssl gawk file
- #下载及说明:
- wget --no-check-certificate -qO InstallNET.sh 'https://moeclub.org/attachment/LinuxShell/InstallNET.sh' && chmod a+x InstallNET.sh
- 说明:
- bash InstallNET.sh -d/--debian [dist-name]
- -u/--ubuntu [dist-name]
- -c/--centos [dist-version]
- -v/--ver [32/i386|64/amd64]
- --ip-addr/--ip-gate/--ip-mask
- -apt/-yum/--mirror
- -dd/--image
- -a/-m
- # dist-name: 发行版本代号
- # dist-version: 发行版本号
- # -apt/-yum/--mirror : 使用定义镜像
- # -a/-m : 询问是否能进入VNC自行操作. -a 为不提示(一般用于全自动安装), -m 为提示.
安装用法示例:
- #使用默认镜像全自动安装
- bash InstallNET.sh -d 8 -v 64 -a
- #使用自定义镜像全自动安装
- bash InstallNET.sh -c 6.10 -v 64 -a --mirror 'http://mirror.centos.org/centos'
- # 以下示例中,将X.X.X.X替换为自己的网络参数.
- # --ip-addr :IP Address/IP地址
- # --ip-gate :Gateway /网关
- # --ip-mask :Netmask /子网掩码
- #使用自定义镜像全自动安装
- bash InstallNET.sh -u 9 -v 64 -a --mirror 'http://mirrors.ustc.edu.cn/debian/'
- #使用自定义镜像自定义网络参数全自动安装
- bash InstallNET.sh -u 16.04 -v 64 -a --ip-addr x.x.x.x --ip-gate x.x.x.x --ip-mask x.x.x.x --mirror 'http://archive.ubuntu.com/ubuntu'
- #使用自定义网络参数全自动dd方式安装
- bash InstallNET.sh --ip-addr x.x.x.x --ip-gate x.x.x.x --ip-mask x.x.x.x -dd 'https://moeclub.org/onedrive/IMAGE/Windows/win7emb_x86.tar.gz'
- #使用自定义网络参数全自动dd方式安装存储在谷歌网盘中的镜像(调用文件ID的方式)
- bash InstallNET.sh --ip-addr x.x.x.x --ip-gate x.x.x.x --ip-mask x.x.x.x -dd "https://image.moeclub.org/GoogleDrive/1cqVl2wSGx92UTdhOxU9pW3wJgmvZMT_J"
- #使用自定义网络参数全自动dd方式安装存储在谷歌网盘中的镜像
- bash InstallNET.sh --ip-addr x.x.x.x --ip-gate x.x.x.x --ip-mask x.x.x.x -dd "https://image.moeclub.org/GoogleDrive/1cqVl2wSGx92UTdhOxU9pW3wJgmvZMT_J"
- #国内推荐使用USTC源 --mirror 'http://mirrors.ustc.edu.cn/debian/'
六、总结
一键重装AutoReinstall.sh和CXTHHHHH重装脚本在腾讯云轻量上测试重装系统成功,其它的脚本如果你在运行的过程出现莫名的错误,一般都是系统不兼容导致的。你可以尝试更换一个原有的操作系统,或者多尝试几个不同的脚本安装,或许就成功了。最后提醒一下DD安装了操作系统后一定要修改默认的密码。